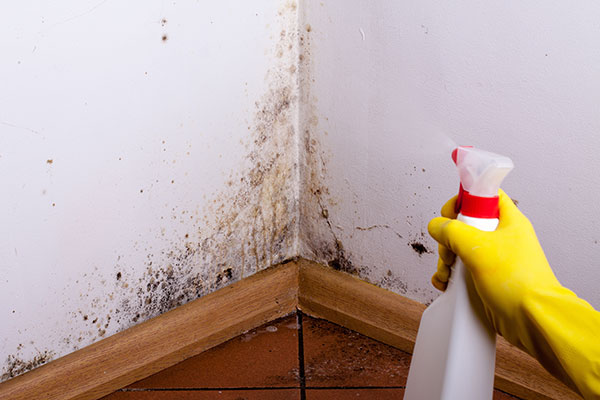
Humidity is one of the problems that afflicts a large percentage of homes. High levels can cause both material damage to building blocks and human health problems. So, if you have also fallen victim to moisture and mold, it is possible that you have found marks on the walls. This means that your walls urgently need painting. But how do you paint a wall with moisture? Below you will find in detail the 4 steps you need to follow.
Moisture on the wall or ceiling almost always has deeper causes. Black mold spots or peeling of the paint are its obvious symptoms. Apart from the external climatic factors, there is a high probability that you are also responsible. Areas that are not well ventilated and lit, such as basements, create humidity. Therefore, you must be careful of your habits in order to prevent evil!
4 Steps for an effective wall painting with moisture!
1. Eliminate marks and moisture requests
On a wall with signs of moisture you can not just apply the paint on top. No matter how many times you do it, it will be in vain, since the problem will remain. First of all, in order to paint a wall with moisture, you must eliminate the source of evil. This could be a hydraulic fault or the high humidity levels in the area you are dealing with.
So call a plumber in New Jersey to fix the problem if it is a pipe failure. Alternatively, we suggest you reinforce your walls with insulating material. More specifically, make holes in the bottom of the wall and through them apply the material inside. This will protect you from future moisture. However, make sure that you have covered the floor and do not want any other surface to get dirty.
2. Sanding & wall cleaning
It is the turn of the cleaning. If your wall is peeled or swollen it is a sample of moisture. You should, therefore, rub it until the old paint is removed. It is necessary to reach a clean and healthy substrate, which can receive the next layers of putty and paint. For the best cleaning of the spots in question with mold marks, use fungicidal liquid. Spray with it and rub well, until all the spots are completely clean. Finally, for greater future protection, we suggest you to cover the entire wall with a special product for the rising moisture from the ground, which you will find in the trade.
3. Wall plastering
Moisturizing the wall is a key step in creating a good substrate of paint. First, make the putty by adding water to the powder according to the instructions. Next, try to plaster any cracks or holes that have formed. Then, put the rest of the wall surface from right to left, starting from the highest point. For your convenience, you can use an angle spatula to join the walls or a smaller one for difficult areas. Once dry, smooth the entire surface of the wall with a hand grinder so it can be painted. Also, wipe the wall with a clean, slightly damp sponge. This will remove any traces of dust. While if you think it is necessary, you can apply a second coat of putty.
4. Paint the wall with moisture
Before painting a wall with moisture, it would be good to apply primer. Be sure to dilute it according to the manufacturer’s instructions and let it dry. After the required time has passed, it is time for the most critical point. For painting a wall with moisture, we suggest that you apply two coats of plastic fungicidal paint. The shade is left to your tastes, but this type is necessary for a problematic wall.
In addition, you can apply a coat of thermal insulation paint. One of the main advantages of this paint is its ability to protect the walls from moisture. Finally, make sure you leave the required time between paints, so that you have an elegant result.
We hope you found our instructions for painting a wall with moisture useful. However, if you need the help of a specialist to paint your walls or external thermal insulation to protect your building, call Gikas Painting Painters!